摘要
前面主要是 vue 的源码仿写,最主要的是 vue 的响应式,以及依赖收集。是一个简易版本,和官方源码还是有很多细微差别的,例如数组代理之后改变数组长度,会触发更新之类的。数组还会被收集长度这种依赖关系,以及数组的一些splice,push,shift,unshift,pop这些方法重写,来完成修复一些数组在 vue 依赖更新中的 BUG。
Vue 中为了解耦,将逻辑分成 2 个模块
- 运行时 核心(runtime)(不依赖平台的 browsweer test 小程序 app canvas….) 靠的是虚拟 DOM
- 针对不同平台运行时,vue 是针对浏览器平台的
- 渲染器
构建自己的 runtime-dom
这个功能主要是为了提供一个操作 dom 的方法,新建一个rumtime-dom的文件夹在packages中。然后 cd 到该目录下运行pnpn init,生成的package.json,修改成如下 。
1
2
3
4
5
6
7
8
9
10
| {
"name": "@vue/runtime-dom",
"version": "1.0.0",
"description": "",
"main": "index.ts",
"buildOptions": {
"name": "VueRuntimeDOM",
"formats": ["global", "cjs", "esm-budler"]
}
}
|
修改项目的 package.json 中 dev 的参数。
1
2
3
4
| "scripts": {
"test": "echo \"Error: no test specified\" && exit 1",
"dev": "node scripts/dev.js runtime-dom -f global"
},
|
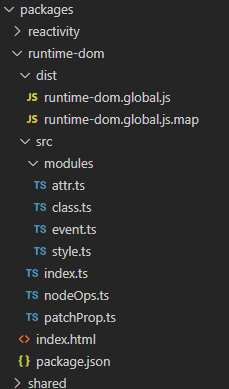
然后参考着官方的文件。创建如下文件
![9ec2af9a91890e8c26b66.png]()
在nodeOps.ts中编写需要的 dom 操作方法。
1
2
3
4
5
6
7
8
9
10
11
12
13
14
15
16
17
18
19
20
21
22
23
24
25
26
27
28
29
30
31
32
33
| export const nodeOps = {
insert(child, parent, anchor = null) {
parent.insertBefore(child, anchor);
},
remove(child) {
const parentNode = child.parentNode;
if (parentNode) {
parentNode.removeChild(child);
}
},
setElementText(el, text) {
el.textContent = text;
},
setText(node, text) {
node.nodeValue = text;
},
querySelector(selector) {
return document.querySelector(selector);
},
parentNode(node) {
return node.parentNode;
},
nextSibling(node) {
return node.nextSibling;
},
createElement(tagName) {
return document.createElement(tagName);
},
createText(text) {
return document.createTextNode(text);
},
};
|
而patchProp.ts主要是操作样式的方法
1
2
3
4
5
6
| export function patchProp(el, key, prevValue, nextValue) {
}
|
先打个小样,后期慢慢填充。
而主要文件 index.ts 中就是将这些合并起来
1
2
3
| import { nodeOps } from "./nodeOps";
import { patchProp } from "./patchProp";
const renerOptions = Object.assign(nodeOps, { patchProp });
|
编写 runtime-dom 内容
runtime-dom 主要是提供一个虚拟 dom 的操作方法。前端在代码编写的过程中,要设置类名,style 样式,绑定事件,还有设置普通属性。还有 node 自身的属性操作。例如将节点增加到指定位置,删除节点等等,这些是 dom 原生就有的功能,可以进一步封装使用。这里学习一下他的核心思想。
所以 runtime-dom 的核心就是提供渲染器需要的 options。实际上 runtime-dom 并未做什么事情。
所以patchProp.ts的代码编写就是这样的。
1
2
3
4
5
6
7
8
9
10
11
12
13
14
15
16
17
18
19
20
21
22
23
24
25
26
27
28
29
|
import { patchAttr } from "./modules/attr";
import { patchClass } from "./modules/class";
import { patchEvent } from "./modules/event";
import { patchStyle } from "./modules/style";
export function patchProp(el, key, prevValue, nextValue) {
if (key === "class") {
patchClass(el, nextValue);
} else if (key === "style") {
patchStyle(el, prevValue, nextValue);
} else if (/^on[^a-z]/.test(key)) {
patchEvent(el, key, nextValue);
} else {
patchAttr(el, key, nextValue);
}
}
|
传入 class 的时候
<div class="a"></div> ==> <div class="b"></div>
这个时候是需要被操纵的元素 dom,还有最新传入的 class 值。这里简单的来看是不需要旧的 class 值的,直接覆盖新值就可以了。
所以modules/class.ts的文件就是抛出一个 pathcClass 函数,这个函数接受了(el,nextValue)
1
2
3
4
5
6
7
| export function patchClass(el, nextValue) {
if (nextValue == null) {
el.removeAttribute("class");
} else {
el.className = nextValue;
}
}
|
传入 style 值的时候
<div style="color:red;font-size:14px;"></div> ==> <div style="color:yellow"></div>
这样的操作,好像直接可以旧值覆盖新值,不用做比较。如果你是一个 vue 开发的话,就知道这样一种写法<div :style="{color:'red',fontSize:'14px'}"></div>,style 可以动态的改变,作为一个对象。这样的话,如果直接覆盖,是不会识别 font-size 的。所以需要做一个新旧值的对比。
1
2
3
4
5
6
7
8
9
10
11
12
13
14
15
| export function patchStyle(el, prevValue, nextValue) {
for (let key in nextValue) {
el.style[key] = nextValue[key];
}
if (prevValue) {
for (let key in prevValue) {
if (nextValue[key] == null) {
el.style[key] = null;
}
}
}
}
|
传入绑定事件
通常原生的 JS 在一个 dom 元素上绑定一个事件,然后换绑定另一个事件。要经历一个绑定->解绑 ->再绑定新的事件。这样的操作十分耗费性能。而如果我们绑定一个自定义的事件,然后在里面绑定要绑定的方法,这样当要绑定的方法更换的时候,不需要重新解绑再绑定,而只需要更新要绑定的方法就行。
所以event.ts
1
2
3
4
5
6
7
8
9
10
11
12
13
14
15
16
17
18
19
20
21
22
23
24
25
26
27
28
29
30
31
32
| function createInvoker(callback) {
const invoker = (e) => invoker.value();
invoker.value = callback;
return invoker;
}
export function patchEvent(el, eventName: string, nextValue) {
let invokers = el._vei || (el._vei = {});
let exits = invokers[eventName];
if (exits && nextValue) {
exits.value = nextValue;
} else {
let event = eventName.slice(2).toLowerCase();
if (nextValue) {
const invoker = (invokers[eventName] = createInvoker(nextValue));
el.addEventListener(event, invoker);
} else if (exits) {
el.removeEventListener(event, exits);
invokers[eventName] = undefined;
}
}
}
|
这样第一次进入的时候是没有值的,所以 el.vei 是一个空对象,并且 invokers 也没有值,那么就不存在缓存了方法名。当进入到下一步的时候要判断传入的时候是空,这样就可以解绑对应的方法。当有值的时候,就进入到了上面说的,绑定一个自定义事件。这样 el.vei 中就有了一个{onClick:(e)=>invoker.value()}。如果你这时候绑定的是一个 a 方法那么就会是这样{onClick:(e)=>a()}。这样当你要绑定成 b 方法的时候就变成了{onClick:(e)=>b()}。
这里并未细致考虑绑定多方法的问题。vue3 是通过数组存储来完成。
传入自定义属性
简单点就是有这个自定义属性就添加,没有值就移除它。
1
2
3
4
5
6
7
| export function patchAttr(el, key, nextValue) {
if (nextValue) {
el.setAttribute(key, nextValue);
} else {
el.removeAttribute(key);
}
}
|
结尾
平常在编写的时候用的都是render或h这样的函数,来渲染虚拟 dom,而不是像文章开头一样,编写很多的 api。那么为了 这样的操作,vue3d 都是交由runtime-core来操作。
也就是说 runtime-dom 的 index.ts 改成
1
2
3
4
5
6
7
8
9
10
| import { createRenderer } from "@vue/runtime-core";
import { nodeOps } from "./nodeOps";
import { patchProp } from "./patchProp";
const renerOptions = Object.assign(nodeOps, { patchProp });
export function render(vnode, container) {
createRenderer(renerOptions).render(vnode, container);
}
export * from "@vue/runtime-core";
|
新建的 runtime-core 就有 h.ts 和 renderer.ts 的函数。
index.ts
1
2
| export { createRenderer } from "./renderer";
export { h } from "./h";
|
h.ts
renderer.ts
1
2
3
4
5
6
| export function createRenderer(renerOptions) {
const render = (vnode, container) => {};
return {
render,
};
}
|
1
| git:[@github/MicroMatrixOrg/vue3-plan/tree/runtime-dom)]
|